The integrity of downhole tubular connections and the risks associated with failure have been considerations in overall wellbore integrity for decades. These considerations have become much more complex as the types of available connections have multiplied over time. The American Petroleum Institute addressed the multitude of connections available as far back as 1934.
After several decades of advances in connection design, concern emerged regarding overall performance of tubular connections during running casing and installation of completion equipment. This concern led to the development of the torque-turn system that evaluates the torque range achieved during a specific number of turns of the connection. If the desired range was achieved, it was assumed that the connection was made up properly. This empirical approach has become today’s primary method for ensuring connection integrity in most operations.
‘See’ the threads
There is a new technology that, while still performance-based, can “see” in significant detail whether or not there are irregularities in the connection thread form and seal areas that might impact performance. This system is based upon a high-resolution infrared imaging of the connection during makeup.
This new makeup verification system was introduced as a joint-industry project (JIP) topic at the June 2005 meeting of the Drilling Engineering Association (DEA), now the International Association of Drilling Contractors’ Drilling Engineering Committee. It subsequently became JIP DEA-160 and was called the Shoulder/Thread Verifier (STV) System. The system offers a new level of detailed thread examination in any connection during makeup without interfering with or slowing the makeup process in any way.
It achieves this capability by passively recording the infrared signature created by the pin and box threads engaging during makeup. The recording is made possible using multiple infrared cameras recording at differing angles. A number of interesting capabilities of the system were noted during the DEA-160 JIP testing. The first was accurate imaging of irregularities during makeup of various types of connections that would not be observed using conventional makeup verification systems.
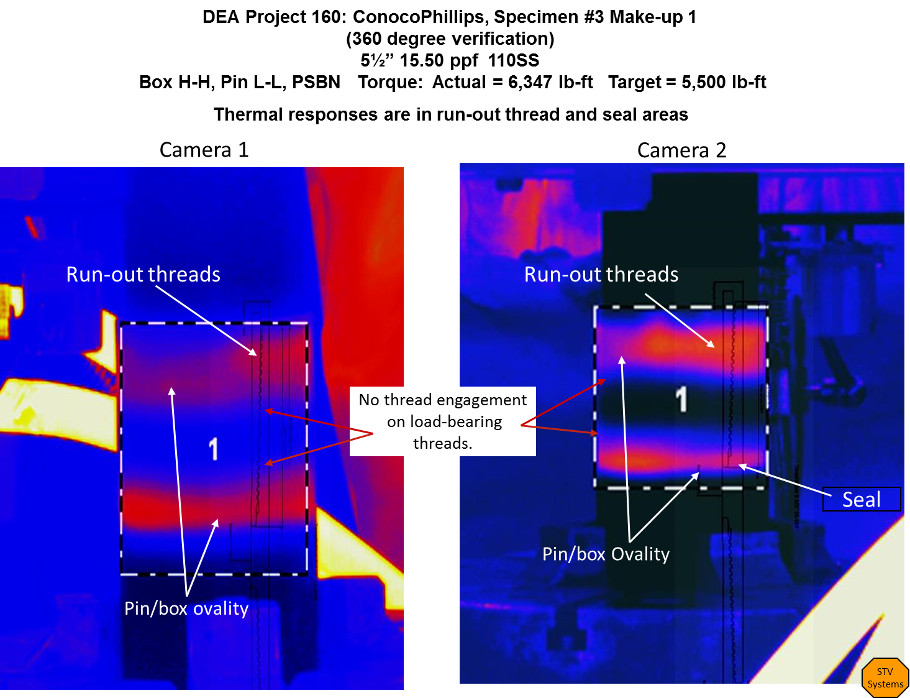
Figure 1 shows—in real time—a casing connection being made up. With the imaging system it is easy to note the following key items likely to lead to connection seal failure and, potentially, axial strength failure:
• The thread ovality is obvious from the differential heating around the circumference of the threads;
• Essentially no heat is being generated at the center of the thread body on the load-bearing threads; and
• Ovality is observed in the seal area, indicating sealing was limited.

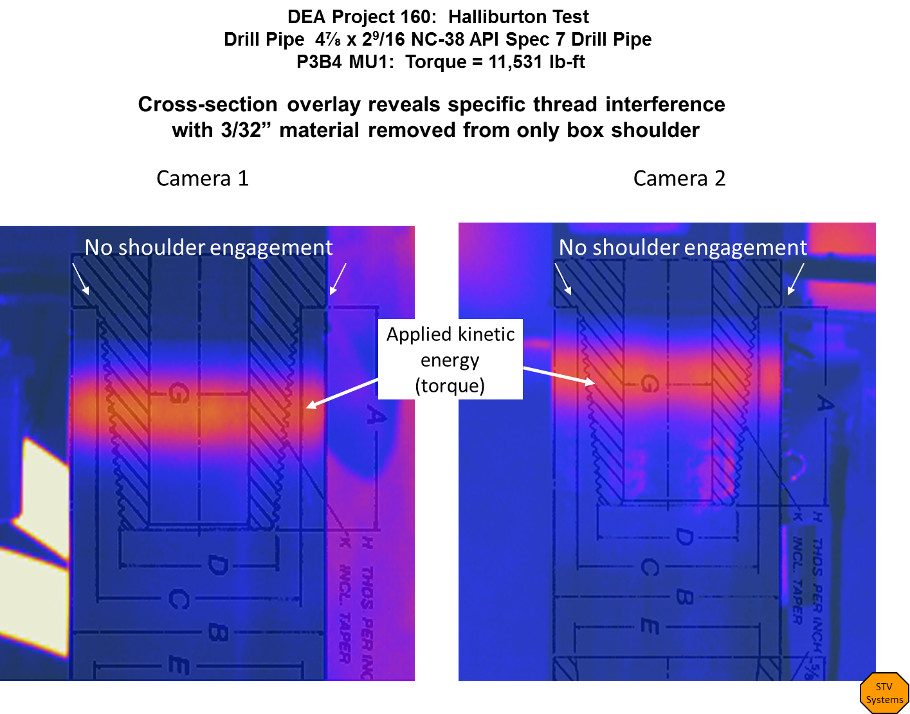
Figure 2 shows a specially altered drillpipe connection that has had 3⁄32 in. removed from the box shoulder, as might be found on reconditioned or overly worn pipe. The STV system clearly showed abnormal heat in the thread body with no heat signature in the pin/box shoulder where it should be. This is made more apparent by the addition of the specific thread form outline for the connection. The simultaneous heat imaging on the thread form outline was a significant improvement to the initial software
setup.

From the DEA-160 JIP, it became obvious that the STV technology has a series of unique capabilities for assuring connection integrity in an operating environment, including:
• Verification that torque is being applied to the complete length of the mating threads, seal and shoulder;
• Provision of high-resolution images with a change detection limit as low as 0.012 C (32 F) throughout the connection; and
• Provision of real-time makeup displays on the user monitors.
Field-testing
Field tests of the STV established that not all connections coming from the mill were the same. Slight variations between connections from one manufacturing run can be out of tolerance enough from cutting inaccuracies in another run that sealing and thread loading issues become obvious under the detailed scan of the STV cameras.
While the nonuniform mating in the pin and box threads was apparent, it might not always result in failure of the connection to perform. In cases where the connection is well within design limits, it is possible that pipe dope or other thread lubricant/lock materials could provide adequate sealing and even some degree of improved sealing performance. What would not be known in this case, however, is at what unexpected running or operational loads within expected designed limits might the string fail.
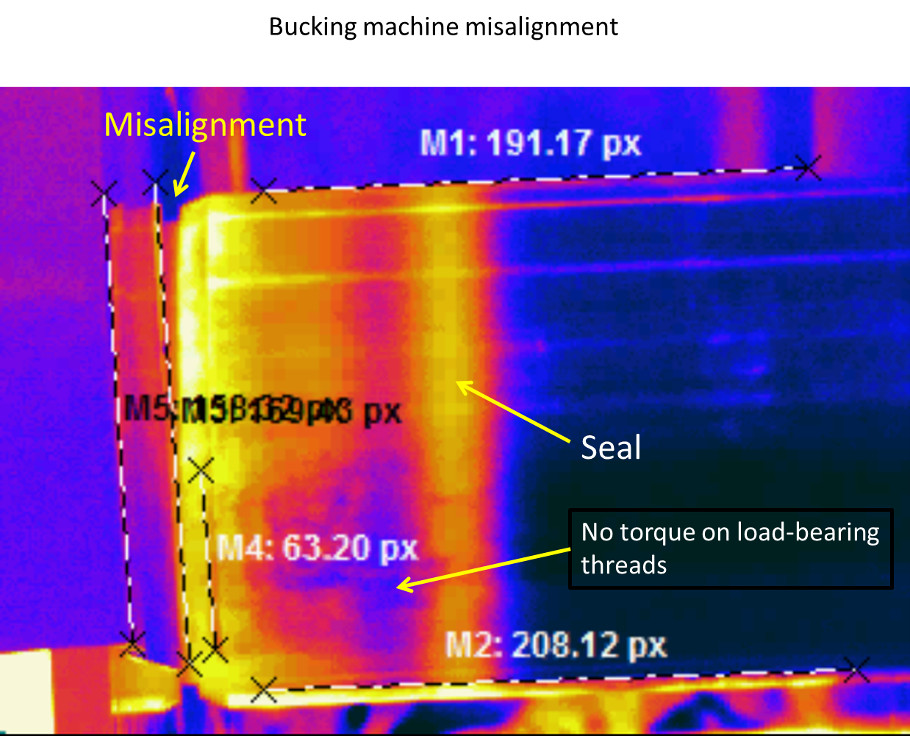
Recently the STV technology was used to evaluate a completion string deployed in severe conditions that started leaking early in the string’s life. The system was set up to evaluate connections once the string had been returned to the shop and a bucking machine was used to break the connections.
Figure 3 shows monitoring applied to the breakout operation. This level of detail shows that there was a problem with the bucking machine once torque was applied; it rotated very slightly (note misalignment in the graphic). This rotation or bending caused inaccurate torque readings during breakout. This was a very important finding since it potentially affected all other versions of this particular machine.

In summary, the STV technology has demonstrated a significant technology gap across the industry from when the connections are made up at the mill to connection integrity to verification when running tubulars into extreme environments and horizontal wells.
Recommended Reading
Ring May Drill—or Sell—Barnett, Devonian Assets in Eastern Permian
2025-03-07 - Ring Energy could look to drill—or sell—Barnett and Devonian horizontal locations on the eastern side of the Permian’s Central Basin Platform. Major E&Ps are testing and tinkering on Barnett well designs nearby.
Utica Oil Player Ascent Resources ‘Considering’ an IPO
2025-03-07 - The 12-year-old privately held E&P Ascent Resources produced 2.2 Bcfe/d in the fourth quarter, including 14% liquids from the liquids-rich eastern Ohio Utica.
Williams to Invest $1.6B for On-Site Power Project with Mystery Company
2025-03-07 - Williams Cos. did not name the customer or the location of the power project in a regulatory filing.
Energy Transition in Motion (Week of March 7, 2025)
2025-03-07 - Here is a look at some of this week’s renewable energy news, including Tesla’s plans to build a battery storage megafactory near Houston.
US Drillers Cut Oil, Gas Rigs for First Time in Six Weeks
2025-03-07 - Baker Hughes said this week's decline puts the total rig count down 30, or 5% below this time last year.
Comments
Add new comment
This conversation is moderated according to Hart Energy community rules. Please read the rules before joining the discussion. If you’re experiencing any technical problems, please contact our customer care team.


