Twist-offs and pipe damage are most commonly the result of downhole makeup and represent a significant loss to operators and drilling contractors. Unfortunately, many have come to accept this as a cost of doing business or have adopted unnecessary design factors or process checks attempting to avoid such outcomes. This is largely because, until recently, there has been little ability to perform true root-cause analysis that includes evaluation of the iron roughneck. A recent study of iron-roughneck process capabilities and original equipment manufacturer (OEM) testing practices led to several important conclusions:
1. Iron roughnecks cannot be excluded as a root cause of connection failures or damage because they do not accurately and consistently apply torque to drillpipe;
2. OEMs have built iron roughnecks to the specifications of operators and contractors, and any deficiencies therein are directly attributable to lack of detail in contracts;
3. Operators should develop rigorous, risk-based process capability specifications;
4. Operators should require detailed factory acceptance tests (FATs) and regular calibration for all machines, tools and instruments;
5. Improving quality through contracts can reasonably lead to significant savings and process improvement with very little investment in time and resources; and
6. Doing nothing will lead to an average cost of $10,000 to $20,000 per onshore well and 10 times that offshore.

Defective contracts
Most drilling contracts contain specifications for absolute machine performance such as hoisting capacity, pump rates and pressures, fluid mixing and storage volumes, pipehandling and storage capacity, and other common rig specifications. Often the only specifications related to pipehandling is that the equipment is present, can meet maximum torque and tool joint parameters and has met minimum mean-time-betweenfailure requirements. However, very few contracts contain detailed contract language defining quality or process capabilities such as accuracy, precision, tolerances and allowable errors.
This lack of detailed specifications has led to an unfortunate but foreseeable outcome: OEMs have developed machines, tools and instruments that meet minimum defined requirements or satisfy the immediate need of a customer. A prime example of this is demonstrated in a study performed in 2014-15 (SPE 178776-MS) showing that, while all manufacturers of iron roughnecks provided tools that could meet maximum makeup torque, none provided a machine that could do so consistently. While all OEMs had, in fact, met the design requirements provided by contractors and operators, none provided a machine that could do so within reasonable process control limits. This is a direct result of poor specifications.
Current state of iron roughnecks
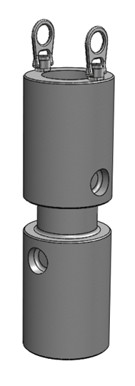
In 2014 a request was made to iron roughneck manufacturers to provide a FAT and field-verification procedure to evaluate the tools. It was determined that such procedures did not exist, nor was there a tool commercially available designed specifically for the field verification of iron roughnecks under typical oilfield conditions. Thus, a fit-for-purpose tool to perform field verification was developed and field data were gathered using the tool—the iron roughneck testing tool (IRTT, Figure 1).

The IRTT was configured to simulate a mated tool joint connection. When placed in the jaws and dies of the iron roughneck, the IRTT will accurately measure the actual torque applied through the hydraulically actuated wrench jaws. Torque measurement is achieved through the use of strain gauges mounted in the bore of the tool in the center gauge area.
The specified maximum error of the IRTT was +/- 1% of maximum load (50,000 ft-lb). Each IRTT was calibrated in a load-frame traceable to the National Institute of Standards and Technology (NIST). A calibration certificate accompanied each sensor documenting actual error rates, typically less than 0.3% over the full range of measurement. Additionally, each sensor had a shunt calibration that returned a predefined value, confirming the strain gauges were measuring properly. The shunt calibration check was performed before each test session. Before deployment of the IRTT for shop or field testing, the operator observed its laboratory calibration in a load frame and evaluated NIST traceability to ensure chain-of-custody and to establish trust between contractors, vendors and manufacturers.
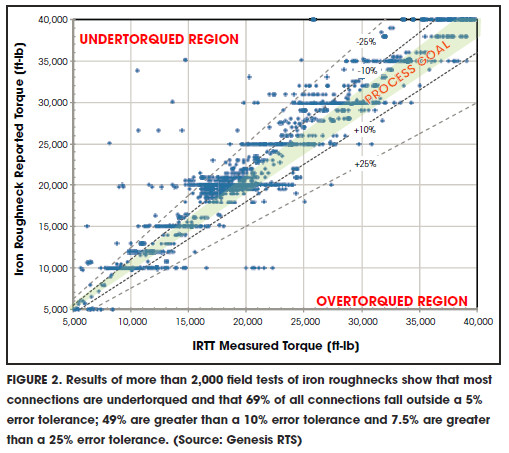
From June 2014 to May 2015 more than 2,000 tests were performed on iron roughnecks. A wide variety of environmental and operational conditions were tested across a wide variety of different types and installations of tools. No particular tool appeared to perform significantly better or different than the other; thus, all data collected are shown together.
It is clearly demonstrated that iron roughnecks are not currently able to consistently make up drillpipe within an ideal range of +/- 5%. Furthermore, based on this large sample size, the probability that an iron roughneck will meet this requirement is only 31%. That is, 69% of all tool joints will be overtorqued or undertorqued (Figure 2). The majority of errors tend to be on the low side, which is consistent with downhole makeup and tool joint damage or failure.

A key finding of this endeavor is that a fundamental shift in culture is required by large U.S. land operators. Operators should take a larger stake in process optimization and tool design. This will likely require the development of internal subject matter expertise that spans hydraulic and electrical system design, controls design, data acquisition and quality control. It also will require dedication from operators to the investment of time and money and the development of long-term collaborative relationships with suppliers and manufacturers. And it will require a higher level of transparency between manufacturers, contractors and vendors regarding roles, responsibilities and cost structures. This lesson has been widely adopted in many other manufacturing and service sectors.
An additional finding is that the current state of tool design and use is the result of the requirements communicated by operators and contractors. In most cases, the tools that exist are a function of market demand. Since the market has not been specific in design requirements, existing tools might not support future performance goals or meet desired quality standards. Therefore, operators should accept that they are the ultimate consumers of the entire supply chain and that they should be the drivers of collaborative, mutually beneficial relationships among the supply base.
Building upon regular quality control evaluations and inspections, it would be wise to develop a basic quality control philosophy. Part of that philosophy should encourage both OEM/contractor internal quality control and regular independent third-party quality audits. This will help maintain transparency and minimize complacency.
Recommended Reading
Equinor Secures $3B in Financing for New York’s Empire Wind 1
2025-01-02 - Equinor’s 810-megawatt Empire Wind 1, which is scheduled to begin commercial operations in 2027, has accumulated the equivalent of about $5 billion in capital investments for the offshore New York project.
Carbon TerraVault Receives California’s First Class VI Permits from EPA
2024-12-31 - The Environmental Protection Agency granted California Resources Corp.’s Carbon TerraVault Class VI well permits for the underground injection and storage of CO2.
Ormat Starts Operations at New Jersey Energy Storage Facility
2025-01-03 - Ormat Technologies Inc. said the Montague energy storage project has a capacity of 20 megawatt/20 megawatt-hours.
Ormat Secures Acreage for Two Geothermal Power Plants
2024-12-26 - Ormat Technologies Inc. secured 1,678 acres from an auction hosted by Utah’s Bureau of Land Management.
Comments
Add new comment
This conversation is moderated according to Hart Energy community rules. Please read the rules before joining the discussion. If you’re experiencing any technical problems, please contact our customer care team.


